Tile and Grout Cleaning – How to Get Rid of Dirty Tile and Grout

Dirty grout can harbor harmful bacteria, mold, and foul odors. Cleaning it regularly prevents build-up, extends its lifespan, and improves the look of your home. Contact Tile And Grout Cleaning El Dorado Hills now!

A pH-neutral cleaner, such as blue dawn, removes soap scum and grime without damaging tile or grout. It also does not leave behind residue or dirty films like mops and steam cleaners do.

tile and grout cleaning

When tile and grout get dirty, they can be difficult to remove. Using a professional tile and grout cleaner will help restore these surfaces to their original glory without the use of harsh chemicals or heavy scrubbing. Before the cleaning begins, a thorough inspection is made to identify any areas that may require special attention. This will allow the technician to develop a plan of action that will ensure the best results.

Tile and grout are both porous materials that will absorb dirt, grime, and stains over time. It is important to clean these areas regularly so that they do not become discolored and dull. This is especially true in high-traffic areas of the home such as hallways, foyers, and kitchens. Dirty tile and grout can also cause slip-and-fall accidents. Regular cleaning will keep these areas safe and clean, and it can even extend the life of the tile and grout.

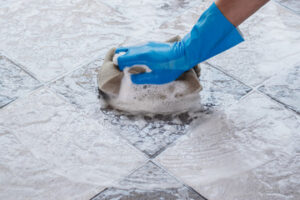
Before beginning the cleaning process, it is recommended to sweep or vacuum the area to remove any loose debris. This will give the tile a smooth surface to work with and will prevent any damage from being caused during the cleaning process. Next, a chemical solution is applied to the grout. This can be a manufactured cleaner such as a degreaser, or it can be made from a simple solution of water and vinegar. Once the solution is allowed to sit on the grout for a few minutes, it is scrubbed with a brush or nylon bristle pad. Once the scrubbing is complete, it is rinsed thoroughly with water to remove all of the dirt and solution.

While scrubbing is often touted as a great way to clean grout, it can be very damaging to this material. If done too often, it can wear away the top layer of the grout and cause it to deteriorate. A better alternative is to use a steam or power scrubber that will allow the grout to be cleaned without the need for hard scrubbing.

Grout is a very delicate material that can be easily damaged. To protect it, it is best to choose a neutral pH cleaner such as water. Highly acidic cleaners, such as vinegar, can erode grout over time and should be avoided.

To maintain a healthy and attractive tile and grout surface, it is recommended to clean the tiles themselves daily and to scrub them with a brush regularly. It is also a good idea to mop the kitchen tile floor every week and the bathroom tile floor once a week (to reduce germs in this high-traffic area). If you follow these tips, your tile and grout will look clean and new for years to come.

Tile makes a beautiful addition to kitchens, bathrooms, and foyers, but it can quickly become dirty and dull. The culprit can vary from room to room—mildew in the bathroom, food splatters in the kitchen, or mud stains on the foyer floor—but they all contribute to that dingy look that’s difficult to get rid of. Fortunately, you don’t need a specialized cleaner or abrasive scrubber to get the job done. All it takes is a little know-how and some of your regular household products.

To keep grout lines looking clean and fresh, you should vacuum or sweep regularly to remove any loose dirt and debris. Then, you can mop with a water-based cleaner that won’t damage the tiles or leave behind a harsh chemical residue. You can also use a high-powered steam cleaner, which works well on most tile floors and is especially effective in removing soap scum, grease, and discoloration from grout.

If you’re going to use a chemical-based cleaner, be sure to apply it sparingly and in a well-ventilated area. Chlorine bleach and cleaners containing chlorine bleach should never be used on grout, as they can cause it to deteriorate and break down. Instead, look for cleaners that are EPA Safer Choice labeled, or for non-chlorine, bleach-based cleaners that contain fewer fumes and less abrasive scrubbing action.

For a natural, environmentally friendly cleaning solution that will work on all grout colors, mix one part water with three parts baking soda to create a paste. Apply the paste to the grout with a nylon-bristled brush or your finger, and then allow it to sit for 15 minutes. You may notice some bubbling as the baking soda begins to dissolve the grime from the grout line. Rinse the tiles and grout with a damp cloth, and then wipe it dry to prevent any residual baking soda from sticking to the surface.

When the tiles and grout are clean, you can finish the project by applying a sealant to the surface. This will help protect the grout from future stains and keep it looking shiny and new for longer. Just be sure to follow all of the product’s instructions, and stay off of freshly-sealed tile for at least 30 minutes (and 24 hours if you’ve used a highly acidic or alkaline cleaner).

When it comes to your building’s public spaces, the appearance of the tile and grout is crucial to the overall feeling of the space. Keeping the area clean and free of germs will make your customers and employees feel comfortable and welcome, and it will demonstrate that you care about the quality of your facility. With a little bit of time and effort, you can get your grout back to its original luster and help your building look its best.

If your tile and grout aren’t looking as bright as they once did, it may be time to call in the professionals. Cleaning these materials can be difficult to do on your own, especially when it comes to getting rid of tough stains that have penetrated the porous surfaces. Professionals also have the equipment necessary to reach into hard-to-reach places where dirt and grime tend to collect.

Depending on the type of tile and grout you have in your home, it is a good idea to clean it at least once or twice per year. This will help keep your floors looking clean and new. If you have colored grout, it is important to use a gentle cleaner so that the color doesn’t fade or get dull. Regular cleaning will keep your grout lines safe and sanitary and prevent mold from growing in the grout joints.

Before the cleaning process begins, your technician will perform a pre-inspection to ensure that the correct method will be used for your specific surface. They will also note any spots or stains that will require additional attention during the cleaning process.

To begin the cleaning, your floors are vacuumed to remove loose dirt and debris. Next, they are scrubbed with a brush or sponge mop to get rid of any remaining residue on the surface of your tile. This is a great time to take note of any cracked or missing tiles as well.

After the floors are cleaned, they are rinsed thoroughly with a powerful extraction system. This is a much quicker process than traditional mops, and it gets rid of all the dirty water on your floors. Your technician will also inspect your floor after the cleaning to make sure they have achieved the results you were hoping for.

Once the cleaning is complete, your floors will be treated with a quality sealant to help your newly cleaned tile last as long as possible. It will be a clear, water-based sealant that helps to promote even color, preserve cleanliness, and waterproof the flooring.

If you’re interested in scheduling a tile and grout cleaning for your home or business, contact us today! Our friendly team would be happy to answer any questions you have.

Before your cleaning service arrives, it is a good idea to move all furniture (with felt pads) and other items from the areas where the floor will be cleaned. This will allow for the best and most thorough cleaning possible. Once the cleaning is done, it is recommended that you stay off of the freshly cleaned surfaces for at least 30 minutes, and avoid getting any liquid on them for 24 hours if you’ve added the protective sealant. After that, you can return all furniture and rugs to the rooms.

How To Properly Prepare Your Auto Fiberglass Repair

Auto fiberglass repair involves more than just a little body filler. It requires careful preparation and the correct use of materials for showroom-quality results.

Our fiberglass repair kit provides do-it-yourselfers with a simple, cost-effective solution for repairs to cracked and broken fiberglass components. This includes fiberglass body panels, windshields, and bumpers. When in doubt, hire a professional Juanito’s Auto Body repair service.   

auto fiberglass repair

Preparation

The number one factor in the success of any composite repair is proper surface preparation. This is particularly important for fiberglass repairs as the strength of the repair depends upon physical bonding to the original primary structure. During the prep stage, all areas that will be repaired should be cleaned thoroughly and the damaged area should be sanded down to create a smooth surface. The sanded area should then be cleaned with acetone to remove all oils and other contaminants that could interfere with adhesion. The preparation phase should be repeated as needed until the surface of the repair is completely smooth and free of any debris.

The next step is to apply a coat of primer to the area that will receive the fiberglass. The primer should be a high-build polyester primer. This will help to seal the fiberglass and protect it from moisture and other harmful chemicals. It is a good idea to use the same type of primer that was used on the vehicle to ensure a consistent appearance.

After the primer has dried, it is time to begin working on the actual repairs. This will require a fiberglass repair kit that includes the resin, hardener, and fiberglass cloth. Depending on the size of the damage, you may also need body filler and glaze putty. The kit should include instructions that will walk you through the process of preparing and applying the fiberglass patch.

When the fiberglass patch is bonded to the damaged area, it will need to dry for a few days. During this time, it is a good idea to keep the repaired area out of direct sunlight and protected from any heat sources.

Once the fiberglass patch is cured, it can be sanded down to create an even and smooth surface. The sanded surface will then need to be painted with a high-build polyester primer. This coating will help to protect the fiberglass and keep it looking great for a long time.

Fiberglass is a versatile and durable material that can be used for many different purposes. It is commonly used for auto-body repair because it offers a strong, long-lasting, and affordable solution for many common problems. However, fiberglass repair is not without its challenges. Getting your car repaired by a professional will ensure that you get the best results possible. They will be able to handle any type of damage, from minor to severe.

Removal

Fiberglass is a strong, lightweight material that is used in many vehicle components. It is resistant to impact and resists rust, making it ideal for use on the body of cars. However, fiberglass can become damaged by scratches and other forms of wear and tear. If your car’s fiberglass is cracked or damaged, you can take it to a professional repair shop to have it fixed. If you want to repair the damage yourself, you can buy a fiberglass repair kit and follow the instructions.

The first step in the process of repairing a fiberglass panel is to clean it. This is done with acetone or soapy water. The area that is being repaired must be thoroughly cleaned to remove any dirt, grease, or other contaminants that can cause problems with the resin. After the area is clean, it must be sanded to prepare it for the patching process. Once the sanding is complete, the surface should be cleaned again using either acetone or soapy water.

To make the repairs, a technician will measure the amount of resin base and hardener needed for the job. Then, the right kind of fiberglass mat will be applied to the area. There are several different types of mats, including woven mats, chop mats, and loose fibers. A Woven mat is best for flat surfaces and a uniform appearance, while a chopped mat is good for heavy curves. Loose fibers are best for small, irregular areas that are difficult to cover with other types of matting.

This step is crucial to the success of the fiberglass repair. If the resin is not mixed properly, it will never set and will become a sticky mess. If too much catalyst is used, it will be impossible to set and will simply remain a gooey substance. The exact procedure varies by brand, so it is important to follow the instructions carefully.

Although this is a simple repair, it can be tricky for beginners to get it right. If you are not a skilled auto mechanic, it is probably best to take your car to a professional shop to have the work completed.

Patching

Fiberglass is a popular material used to design the body of automobiles. It is durable, lightweight, and can be molded into many different shapes. It also resists impact and won’t rust like steel. However, fiberglass can be damaged by collisions or other accidents. This is why it’s important to have it repaired by a professional. If your car’s fiberglass is damaged, you should take it to an auto body repair shop that specializes in this type of repair. These professionals will ensure that the repair is done correctly.

A professional will start by sanding the area where the repair is going to be made. This will help to create a mechanical bond and remove any dirt or grease. Then, the technician will apply a layer of resin to the surface. Once the resin has been set, the technician will lay a piece of fiberglass cloth or mat over it. The fabric will be saturated with the resin, and any excess will be removed. The technician will then repeat this process until the damage has been repaired.

When repairing fiberglass, it is important to use a quality product and follow the instructions carefully. The repair should also be done in a clean environment. In addition, it is a good idea to use a catalyst in the mixture to help it set faster. This is especially important if the area is going to be exposed to sunlight.

In some cases, the damage to a fiberglass structure may be too severe for patching. In this case, the entire surface of the structure may need to be bonded. A skilled fiberglass technician can repair most types of fiberglass structures, including boats.

When repairing fiberglass, it is best to work in a well-ventilated area with a respirator. Using a respirator will prevent inhaling the fumes from the resin and other chemicals. It is also important to wear protective gloves and eyewear when working with fiberglass. In addition, the worker should have access to a clean water source and a dust suppression system. This will make the job easier and safer for the worker.

Bonding

The final step in the auto fiberglass repair process is to bond the new material to the old. As we mentioned above, this is a key part of ensuring that the finished work is strong and durable. A lot goes into making this bond, from ensuring that the surface is clean and prepped to using the right adhesives and materials. For example, it is essential to use a urethane or epoxy resin to ensure that the bond will be strong and long-lasting. This is particularly important if the repair will be exposed to a lot of moisture.

This can include a vehicle that is driven frequently in damp conditions. This can lead to stress fractures and deterioration of the surface. It is important to address this issue by incorporating a corrosion protection layer in the coatings used during the repair process. Another way to prevent this is to apply a primer and sealant to the repaired area.

Fibreglass is an incredibly useful material for repairs and construction projects that require a high level of durability and strength. It is often used in applications such as boat hulls, flat roofs, water storage tanks, and other structures that can benefit from the resilience of fiberglass.

For automotive applications, several different types of fiberglass can be used in vehicle bodies and components. These include SMC and FRP (traditional fiberglass) as well as a variety of composites such as carbon fiber. While these materials are typically more expensive than other materials, they provide a higher degree of stiffness and strength and are very effective in reducing noise, vibrations, and impact resistance.

Fiberglass is a strong and durable material that is resistant to several different types of damage. However, it is still susceptible to scratches and other common types of wear and tear. If you notice any type of damage to your car’s fiberglass body, it is important to have it fixed by a professional. At some shops, they are fully equipped to repair any fiberglass damage on your vehicle and can restore it to like-new condition.

Warehouse Loans and Mortgage Lenders

A mortgage lender is essentially the business you go to when you wish to acquire a house loan. Mortgage brokerage is simply a business or person who offers house loans from many different lenders. Many people often turn to mortgage brokers when they wish to have a house loan because the names of many of these businesses are well-known by the public. For example, many banks are commonly referred to as mortgage lenders.

Mortgage Lenders

When it comes to shopping for a house loan, it can be overwhelming at times. There are so many different Mortgage Lenders out there. You can go through the application process with several of them without even knowing which one will give you the best deal. This is why you need to work with mortgage brokers. These brokers will be able to take all of the guesswork out of your mortgage search and help you find the right mortgage for your needs. Here are some of the reasons why using mortgage brokers is the best way to get a mortgage.

Brokers work for you from the very beginning. Once you decide which lender you would like to go with, the broker does the initial research on these lending institutions to find out the terms and interest rates for each one. After this initial research is done, the broker can then narrow down the mortgage lenders based on your specific location and zip code. From this listing, you can narrow down your choices by the area code and state that you are applying in. This makes the entire application process much easier.

Another great reason to use mortgage brokers is because of their ability to shop around for the best deal. Most people who are shopping around for a house tend to take on more than one lender because of the competitive nature of the market. However, using a single lender can result in very inflated closing costs. With the assistance of a broker, you can get multiple quotes from multiple mortgage lenders with only a click of the mouse.

Brokers have access to a huge variety of mortgage lenders through their employment with different banks. Mortgage brokers are also aware of any changes that may be occurring within the lending industry. This means that they will know if there has been a significant change in a particular lending company’s policy. As a result, you can be guaranteed that you are always going to be getting the very best deal.

Lastly, you can be assured that you are going to get the lowest mortgage rates through working with mortgage brokers. The majority of banks to offer their clients a set interest rate. If you want to secure better mortgage rates, then you will need to secure financing from multiple mortgage lenders. However, most people are simply not in a position to secure financing from so many different lenders. Using an independent mortgage broker allows you to secure the very best mortgage rates from one source. Brokers are very good at negotiating interest rates, which is what is often the deciding factor in a large majority of mortgage loans.

When you apply for a mortgage loan, the lender will ask you to provide a credit union or bank account number. In turn, this information will be cross-checked with all of the different types of mortgage lenders that are currently available. It is important to ensure that you are only providing the information required by your mortgage lender. A mortgage lender will use this information when sending your application to the appropriate lender. As a result, you will be provided with the best possible interest rate available.

Brokers, like warehouse lenders, understand that there are many unique aspects to the entire lending process. Mortgage brokers understand that each bank or credit union has its own set of rules and requirements. Warehouse lenders understand that each bank or credit union has its own set of rules and requirements. Mortgage lenders understand that the overall lending process can take several days. Therefore, these types of mortgage lenders will often lend you the money overnight.